Here are 7 basic fingerpicking patterns that you can practice to improve your fingerstyle technique.
We’re going to take a look at 7 essential fingerpicking patterns that will help you develop the right-hand coordination skills to tackle even the trickiest fingerpicking pattern.
If you’re looking to explore fingerstyle guitar songs, or you are searching for some warm-up exercises, then you’ve come to the right place.
It's therefore a good idea to have some exercises that you can practice your fingerpicking and concentrate on your plucking hand.
Here are seven basic fingerstyle patterns that will help you achieve this quickly and without frustration.
Understanding Basic Fingerpicking Patterns
When playing fingerstyle patterns on the guitar (using the fingers), you should stick to the following rules to get the most out of these exercises.
- The thumb plays the bottom three strings (the bass strings which are the 6th, 5th & 4th strings) and it has ownership for any notes played on those three strings (the ones nearest your head). If there is a note on the 6th, 5th or 4th string, the thumb must play it!
- The index finger always plays the G string or 3rd string.
- The middle finger always plays the B string or 2nd string.
- The ring finger always plays the high E string or 1st string.
Simple! However, it will take a little bit of practice for those fingers to obey. In particular, without developing the proper habits, some students end up playing with one finger, which is a huge trap that you must avoid at all costs.
Make sure you obey this rule when practicing these basic fingerpicking patterns.
Plucking Hand Finger Indications
You may find some letters next to the notes in the exercises below. These are indications for which fingers should pluck the strings.
In classical guitar notation, these fingers are often abbreviated as p for thumb, i for index, m for middle, and a for ring. These letters come from their Spanish names, as fingerpicking has roots in Spanish classical guitar traditions:
- Pulgar = Thumb
- Índice = Index
- Medio = Middle
- Anular = Ring
So if you translated “thumb, index finger, middle finger, ring finger” into Spanish, you would get “Pulgar, Índice, Medio, Anular”. And because the origins of fingerpicking are from that part of the world, that is now a well used standard.
7 Basic Fingerpicking Patterns For Beginners
Here are 7 fingerpicking patterns I came up with to practice fingerstyle. Each pattern lasts for 2 measures, and you can repeat them as often as you like.
Remember to simplify the fretting hand as much as possible, as the point is to work on the plucking hand.
Let's get started with something super straightforward that only uses the open strings.
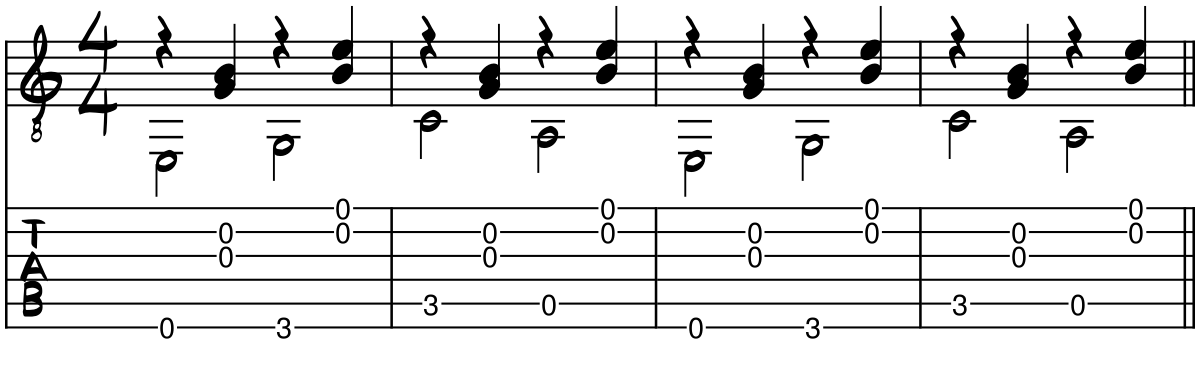
1. Simple Arpeggio Warmup
To get your plucking hand nicely limbered up, start with this pattern. It's deceptively simple, but make sure you coordinate the thumb with the second finger that switches bass notes after every arpeggio.
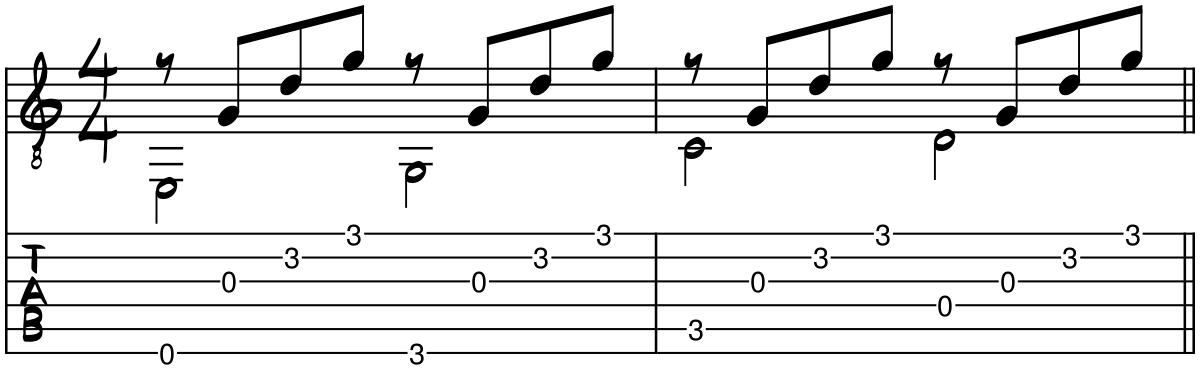
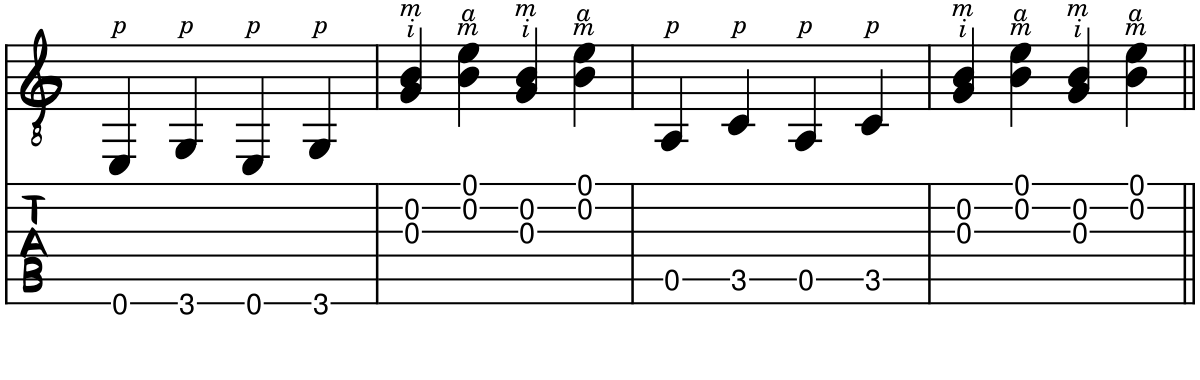
2. Rolling River Roll
Let's practice this time a pattern where you will immediately pluck the treble strings after the bass strings. Make sure to keep the hand steady as you do this.

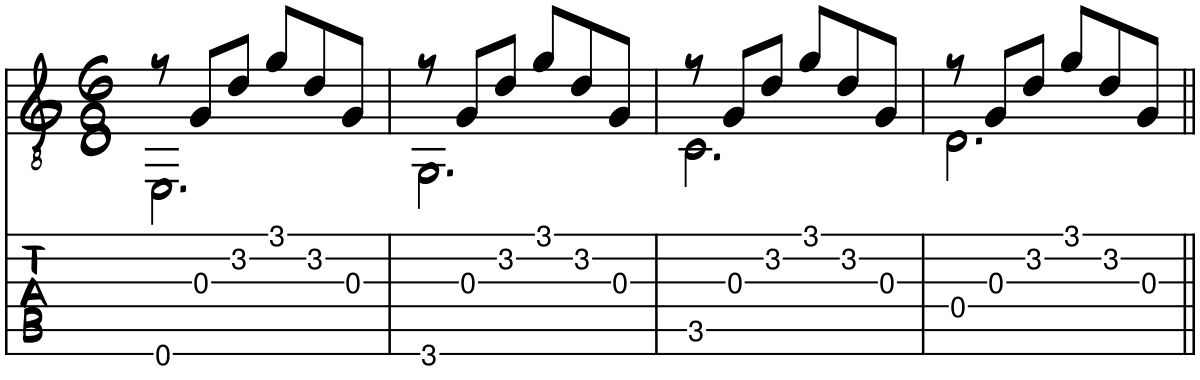
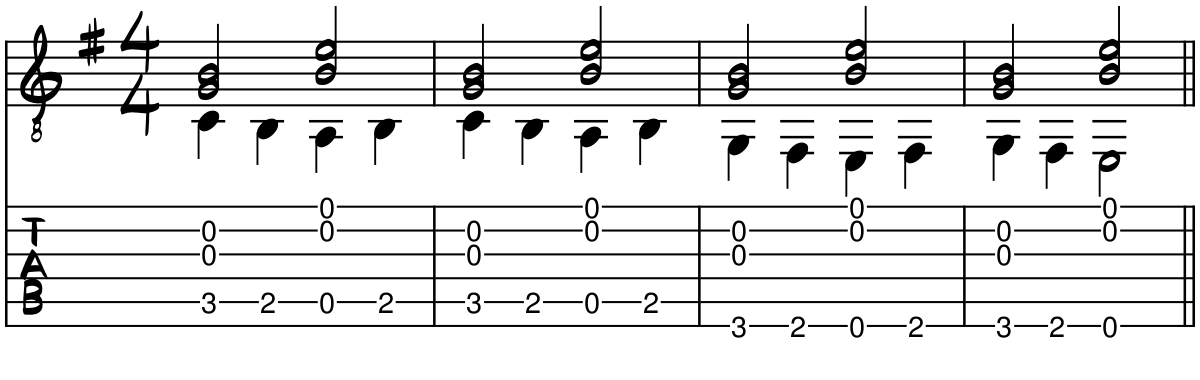
3. Rolling River Roll (6/8 version)
The same as the minor version, except in 6/8 time. This time, make sure you follow the right hand finger rule exactly, to make the arpeggio smooth.
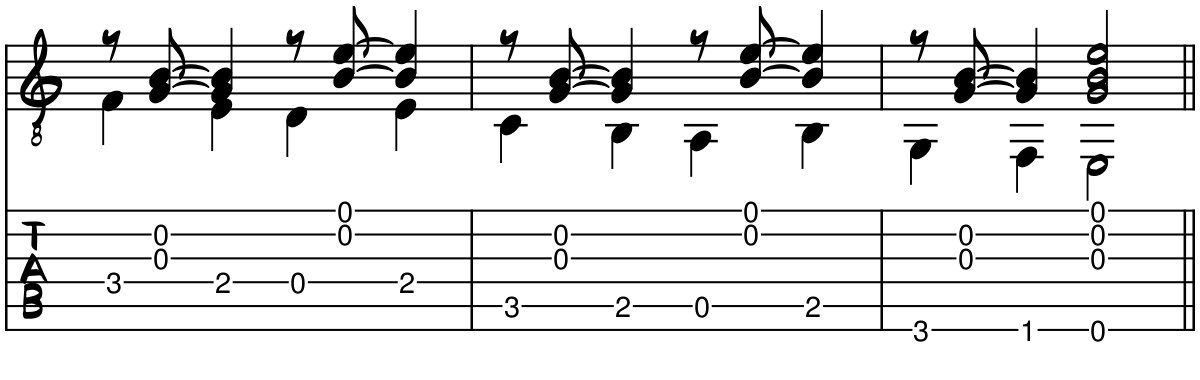
4.Open Boom Chuck
Here's a classic-style pattern you can practice to build crossing independence between your fingers. Too many exercises involve playing the notes in the order p,i,m,a or a,m,i,p, and this does you a bit of a disservice when you encounter more complex patterns. Here's one such pattern that doesn't follow the natural order of the fingers.
5. Walking And Talking
Once again, like the rolling river major version, you must be careful to use the correct finger, and carefully coordinate the thumb with the fretted notes. Don't play this exercise too fast, as it can get sloppy if you're not precisely plucking the string.
6. Walking Bass Bingo
A lot of fingerpicking patterns involve simply playing arpeggio patterns, without requiring you to play notes simultaneously. This simple walking bass pattern makes you work out all the fingers.
7. Swinging Cascade
If you want more practice doing the previous fingerpicking pattern but this time playing the treble notes off the beat, here's how you can achieve that.
How To Perfect Your Fingerpicking Patterns
As you can see, we started by playing patterns while holding a single chord with the left hand. Then, as we progressed, we began playing patterns while changing chords with the left hand. This is more challenging as it requires coordination between both hands.
As fingerstyle guitarists, it's much easier for us to perform intricate patterns than it is for flatpickers. Unfortunately, this makes it very easy for us to play patterns that sound sloppy, due to improper technique.
Think about when you play a chord: you strum all the strings at once. But when you fingerpick, each finger will hit individual strings. It becomes really obvious which strings are fretted properly, and which strings contain buzzing or missing notes.
For instance, I often notice that if I play a fingerpicking pattern without paying attention to my finger movements, I find sometimes that I fail to properly pluck the string and have the note ring true.
When you play fingerstyle guitar, you must take into consideration proper finger placement for both hands: the left hand which is fretting the chords or individual notes, and the right hand which plucks the strings. You will need to reverse right and left if you are playing a left-handed guitar.
With Play Fingerstyle Guitar Now!, you'll gain the tools and knowledge necessary to perfect your fingerstyle technique and avoid sloppy playing caused by missing or badly fretted notes.